Creating a simple web app with FastAPI and Streamlit
For a while now, I’ve wanted to learn how to create a web app to deploy machine learning models with API endpoints. Although there are easier ways to deploy models, I wanted build something from scratch. In this blog post, I use FastAPI and Streamlit to create a web app that deploys a machine learning model that Users can interact with. In my search online for material to learn from, I came across this mini-series by Krish Naik which this project is largely inspired by. I also went a step further and created a user interface for the webapp using Streamlit.
You can find the code and the dataset for creating this web app in my GitHub repo: link. Here’s a quick overview of the tech stack for this web app:
- Uvicorn: a Python-based web server that will power our web app.
- FastAPI: a simple Python-based web framework that we use to create the API endpoints for our web app.
- Pydantic: a data-validation library for Python. We’ll use this to validate User’s inputs.
- scikit-learn: a Python machine learning library that has some very common built-in machine learning models and machine learning tool APIs available. We’ll use this to build and train our classification model.
- pickle: a library that we will use to serialize our trained model which we can then expose to an API endpoint in our web app.
- Streamlit: we’ll use this framework to create the frontend user interface for our web app.
- requests: a python package that let’s us make HTTP requests. We’ll use this to connect the UI to the web app’s API endpoints.
The machine learning model we will train and deploy via the web app is a Random Forest Classifier that is trained to classify Banknotes as authentic or fake. The training dataset for the model is the Banknote Authentication dataset (UC Irvine Machine Learning Repository).
Installation
- Start by cloning the GitHub repo to your local environment - link
- Inside the folder that you cloned the repo, create a python virtual environment and then activate it.
- Using pip as your package installer install all the package dependencies listed in the
requirements.txtfile.
pip install -r requirements.txt
- At this point, you have everything you need to run the app locally. If you’d like to do that, continue reading or if you’d like to learn how to code the whole project then you can skip to the next section. To run the app, open your terminal, start the uvicorn webserver and then run the Streamlit app.
# start the uvicorn server
uvicorn app:app --reload
#start the Streamlit app
streamlit run frontend.py
If both the web server and the Streamlit app run successfully, then you should be able to access the user interface at http://localhost:8501 or whatever URL is specified in your terminal output after running the Streamlit app.
The machine learning model
The serialized machine learning (ML) model file is already in the repo and is called classifier.pkl and since it is pre-trained, you can readily use it for inference. But, if you would like to generate the ML model artifact from scratch and/or make any tweaks to it, you can follow the steps in the Jupyter Notebook banknote-authentication-model.ipynb. The dataset is also in the repo and is called data_banknote_authentication.txt. Here are a few additional notes about the ML model:
- The ML model is a Random Forest Classifier that was built and trained using scikit-learn APIs.
- The dataset contains 1 label column and 4 feature columns. The label column-
classis made up of binary values where a value of0means the banknote is authentic while a value of1means that the banknote is fake. The 4 feature columns-variance,skewness,curtosisandclasscontain values from statistics genreated from photographic data of banknotes in the sample. - After training, we serialize the ML model using pickle to create the
.pklfile that is ready for deploying through the web app.
Data validation using Pydantic
We will use a library called PyDantic to handle the data validation for the 4 ML feature values that Users pass to the model. To do this:
- Create a file in your directory called
Banknote_DataValidation.py. - Open the file and start by importing the
BaseModelclass frompydantic. This allows us to create structured data models with automatic type validation.
from pydantic import BaseModel
- Next create a new class that will serve as the data model for User inputs. This class inherits from Pydantic’s
BaseModeland extends it to apply data validation to the 4 ML feature inputs.
class DataValidation(BaseModel):
    variance: float
    skewness: float
    curtosis: float
    entropy: float
Creating the web app and its API endpoints
- Start by creating a file in your directory called
app.pyand then open it. - Import the required Python libraries
# ASGI web server library
import uvicorn
# Web framework/ API framework
from fastapi import FastAPI
# Pydantic class that you defined for data validation
from Banknote_DataValidation import DataValidation
# libraries for data manipulation
import numpy as np
import pandas as pd
#library to manage pickle file of the ML model
import pickle
- Open and load the serialized ML model artifact using pickle.
# Load the serialized pickle file of the trained model you created using the Jupyter Notebook
pickle_in = open("classifier.pkl", "rb")
classifier = pickle.load(pickle_in)
- Instantiate the FastAPI app and start defining the routes. Routes are the same as API endpoints and in FastAPI you use Python decorators to define routes and decorate the functions/operations that you want the route to access. We’ll start off by creating the index route of the web app which strictly speaking is not mandatory, but it is the default route of the web app which is mapped to the root URL of the app -
/. Users accessing the web app’s default URL will be led to this route.
# Instantiate the FastAPI app
app = FastAPI()

# Index route, this is default route that usually automatically opens at http://127.0.0.1:8000
@app.get("/")
def index():
    return {"messaage" : "Banknote classifier app"}
- Define a route that will be an API endpoint that you can be accessed using a GET request. This route will take a string parameter value and return a string message.
# A Route that takes a single parameter and returns the value passed to it with a message
@app.get("/{name}")
def get_name(name:str):
    return(f"Welcome {name}, to the Banknote classifier app!")
- Create a route that will be used to deploy the ML model. This endpoint can be accessed using a POST request and takes a JSON payload as input. The JSON payload will contain the parameter values for the 4 features that are needed to make a classification prediction. This JSON payload will be validated using the Pydantic data structure. This route is also responsible for passing the input values to the ML model, getting the inference results and then processing and returning the output to the User.
# Create a route for the classification functionality
@app.post("/classify")
def classify_banknote(data:DataValidation):

    # store the values passed through the API endpoint
    data = data.dict()
    variance = data["variance"]
    skewness = data["skewness"]
    curtosis = data["curtosis"]
    entropy = data["entropy"]

    # Get the prediction by passing the feature values to the model return the prediction
    prediction = classifier.predict([[variance, skewness, curtosis, entropy]])

    if prediction[0] > 0.5:
        prediction = "Fake Banknote"

    else:
        prediction = "Authentic Banknote"

    return prediction
- Define the command to run the web app only if it is being executed directly and not if it is ever imported as a module.
# Run the webapp with uvicorn; Access it at http://127.0.0.1:8000
if __name__ == "__main__":
    uvicorn.run(app, host = "127.0.0.1", port = 8000)
- You are now done with defining the web app and it will run even without a front end. If you want to test it out, you can run the following command to start the web server and access it at
http://127.0.0.1:8000.
uvicorn app:app --reload
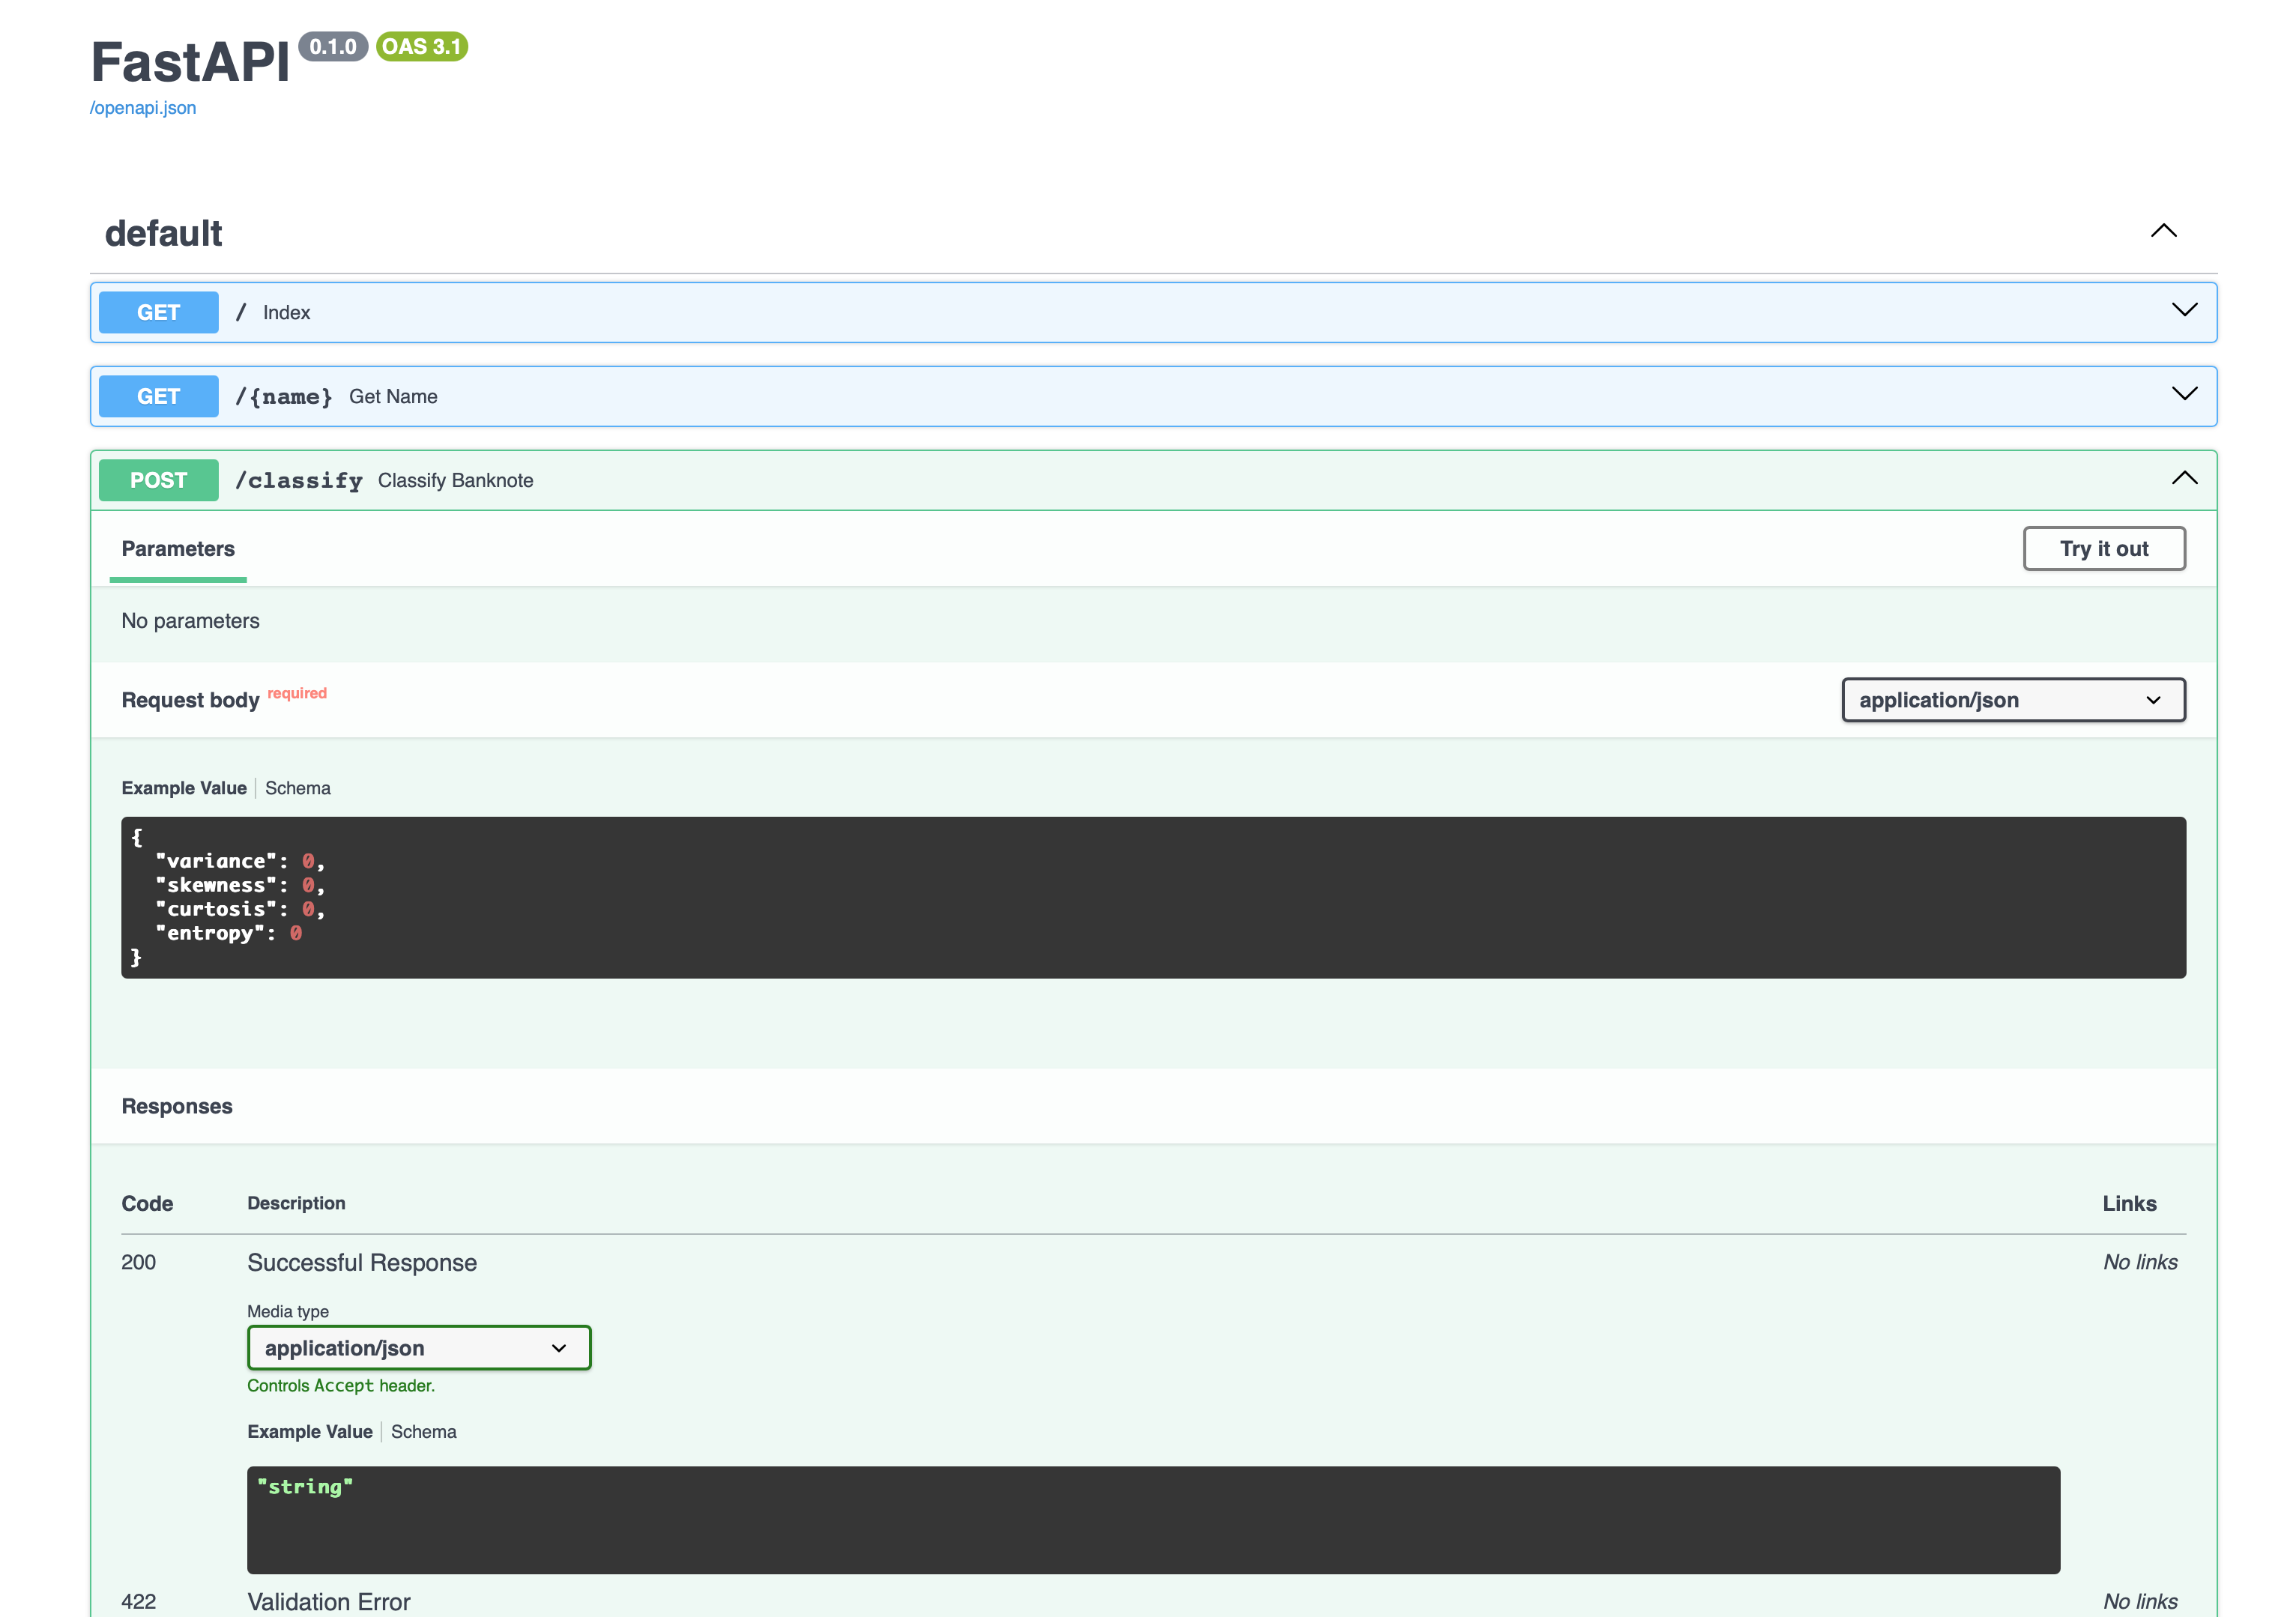
- FastAPI automatically creates some basic documentation for your API endpoints and even creates an HTML page called Swagger UI that let’s you use the endpoints. You can access it at
http://127.0.0.1:8000/docs. Below is a screenshot of what that looks like.
Creating the web app’s User Interface
In this section we will define the UI functionality for your web app that will let Users easily access the API end points and send data to your web app and see results like the ML model’s outputs. For doing this, we will use Streamlit which is a Python framework that provides ready to use UI components that can be put together using very few lines of code. We will then connect these to the web app’s API endpoints using the requests library that enables us to make HTTP requests.
- Create a new file in your directory called
frontend.pyand open it. - Import the required libraries and then set the URL at which the Streamlit app should access the web server. This is the same URL at which the web app is running.
# Import the required libraries
import streamlit as st
import requests

# Set the base URL for your FastAPI app
BASE_URL = "http://127.0.0.1:8000"
- Add a title and a menu for your web app’s UI. The menu options correspond to the two API endpoints
/{name}and/classify.
# Create a title for the FastAPI app that will be always shown on any route
st.title("Banknote Classifier App")

# Create a navigation menu for Users to navigate to the two main routes of the web app/ two main endpoints
menu = ["Welcome Page", "Classify Your Banknotes"]
choice = st.sidebar.selectbox("Choose an option", menu)
- Code the UI logic that will enable the User to interact with the
/nameAPI endpoint and see a welcome message in the UI when they select theWelcome Pagemenu option. Note that we will be using anif elseblock to trigger the correct API endpoints based on the User’s menu option selection.
# Logic for the "Welcome Page" that will take a string input, feed it to the endpoint and output a welcome message on screen
if choice == "Welcome Page":
    # Sub-heading that will be shown to the User
    st.subheader("Welcome Page")
    name = st.text_input("Please enter your name:", "")
    if st.button("Greet Me"):
        if name:
            # If you get a valid string input then invoke the  of your web app with the string input
            response = requests.get(f"{BASE_URL}/{name}")
            st.success(response.text)
        else:
            # Display an error warning asking the User to enter a valid string to execute the greeting
            st.warning("Please enter your name!")
- Code the logic to trigger the
/classifyAPI endpoint when User selects theBanknote Classifiermenu option. This is page of the web app also uses Streamlit UI components/APIs that let the User enter values for each of the 4 input parameters of the model. Some things to note:- The
st.subheadercomponent in Streamlit let’s you display a string sub-heading in any page of the UI. - The
st. number_inputis a Streamlit API that creates a number input UI component. We have defined one for each of the 4 model input parameters. - The
st.buttonis a Streamlit API that creates a button and returns a value that can be used to trigger downstream actions when clicked. Here we use it to pass the input paramter values to the model and kick off inference. - We also wrap the API request within a
try exceptblock to catch and display any network errors and/or server errors to the User.
- The
# The page and logic that will be triggered if the User chooses the Banknote Classifier option from the menu
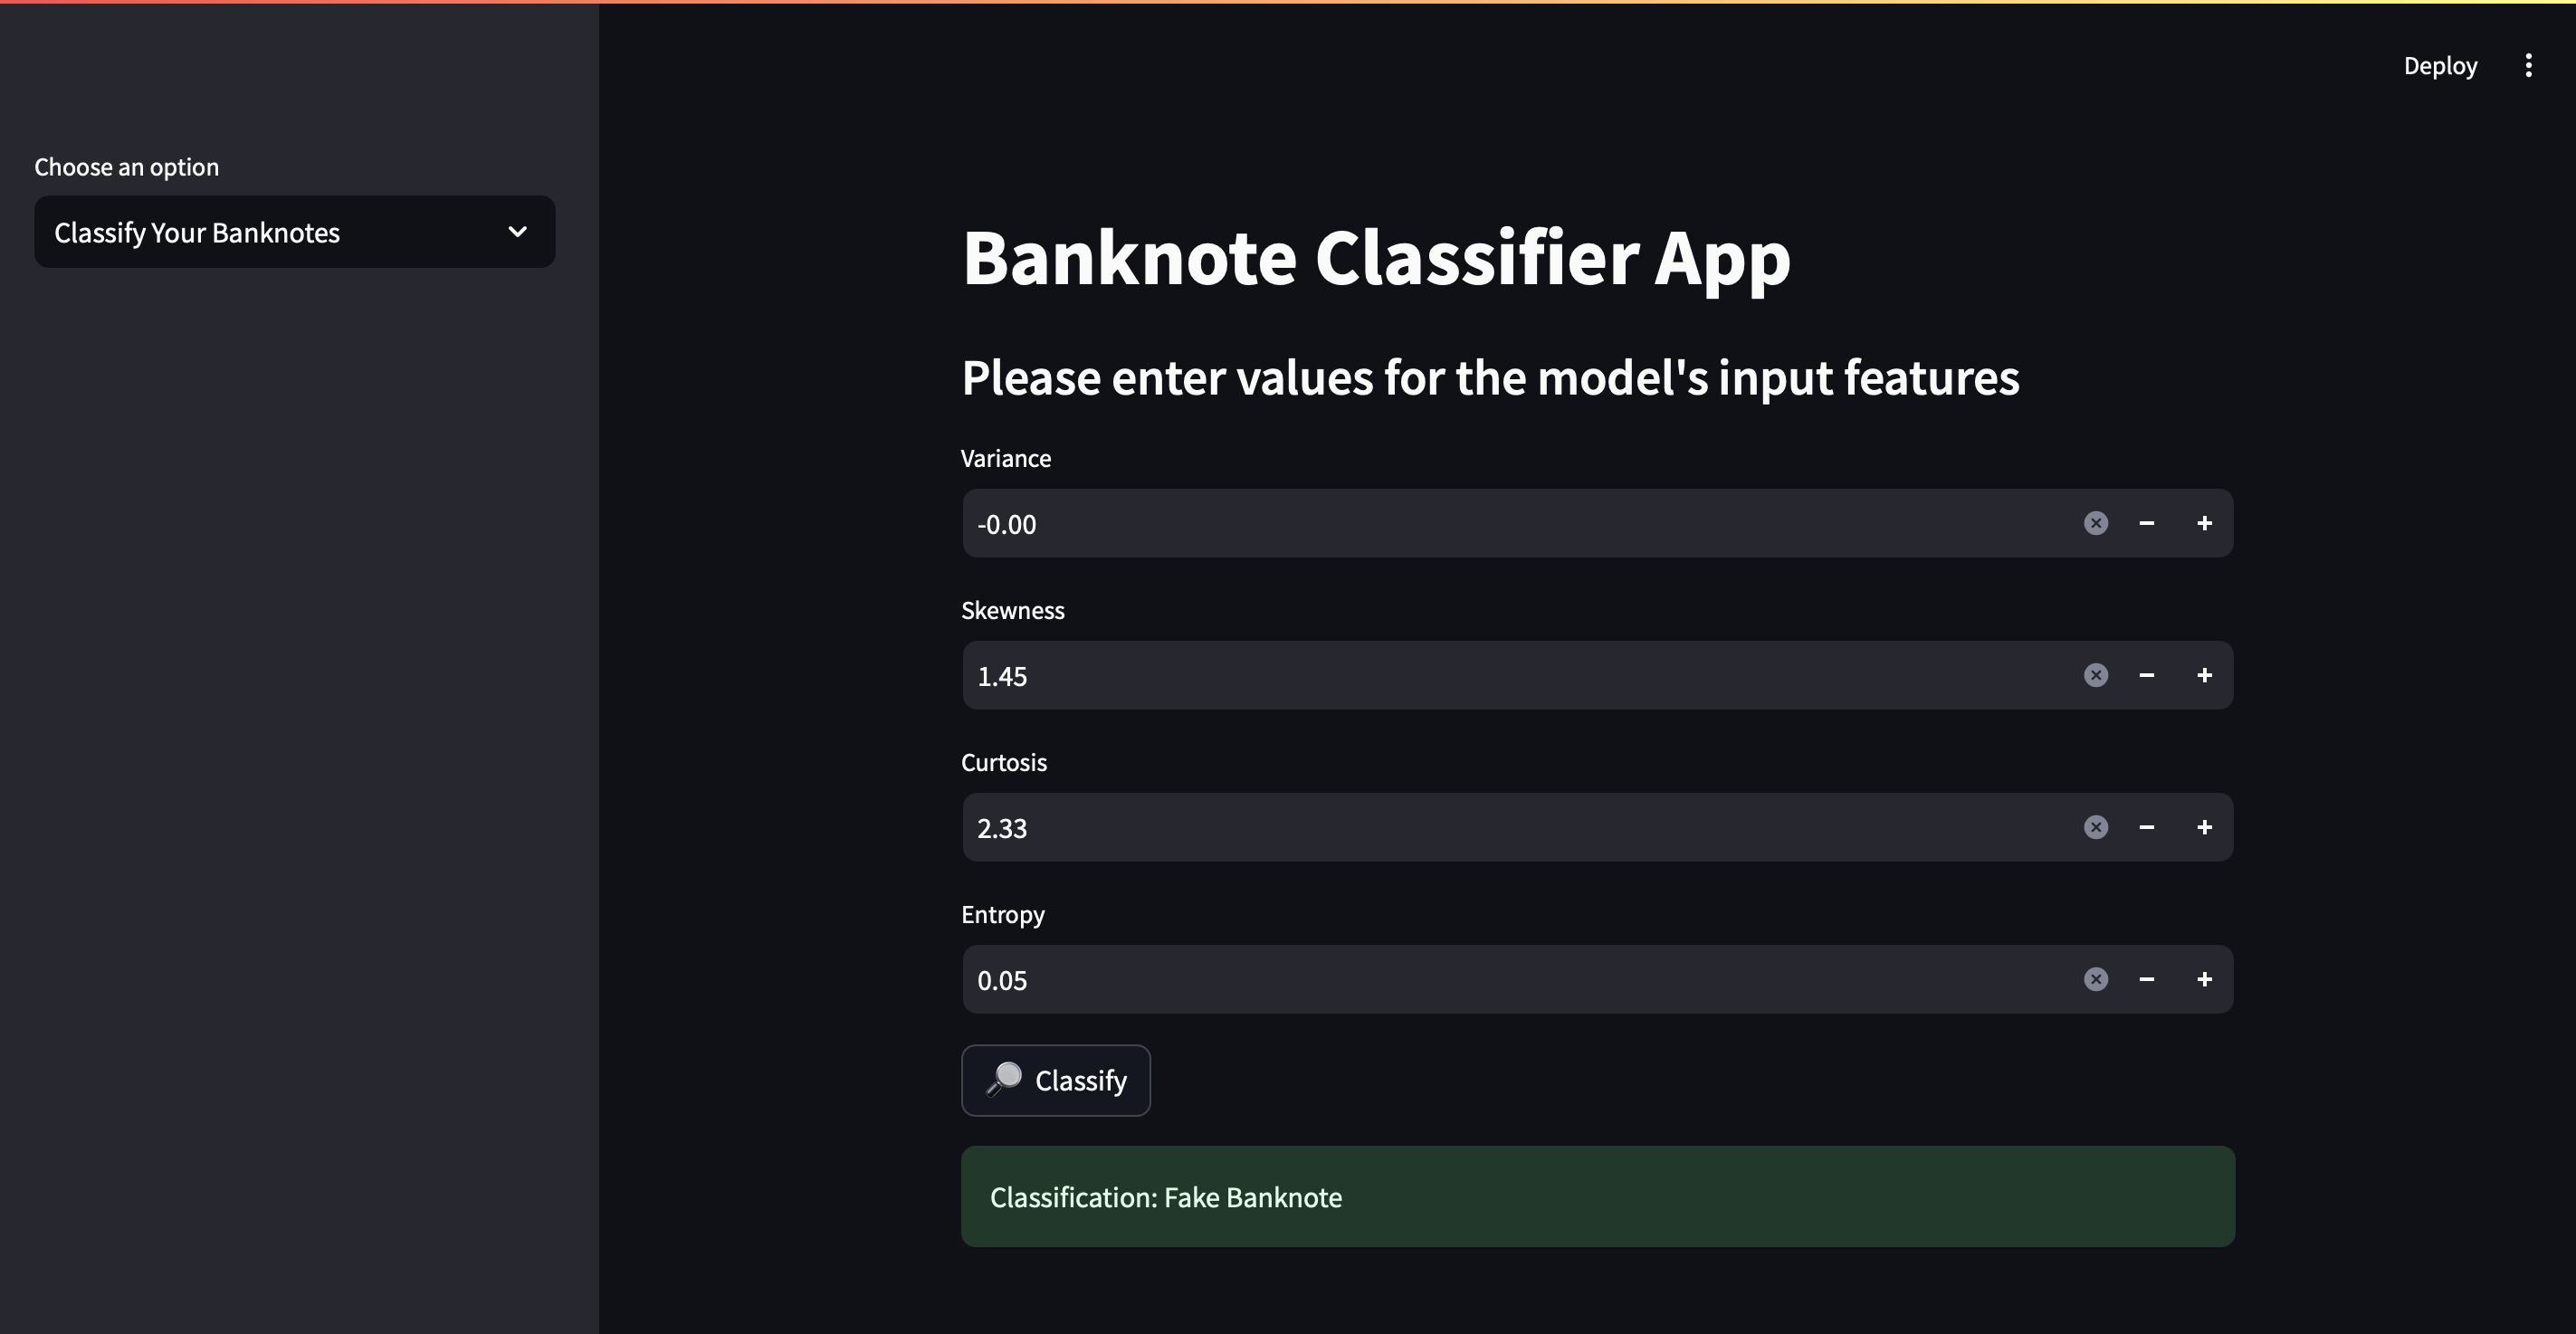
elif choice == "Classify Your Banknotes":
# Sub-heading that will be shown to the User
st.subheader("Please enter values for the model's input features")
# For each input feature, store the value that the User passes; The default value is None
variance = st.number_input("Variance", value = None)
skewness = st.number_input("Skewness", value = None)
curtosis = st.number_input("Curtosis", value = None)
entropy = st.number_input("Entropy", value = None)
# If the button is clicked by the User then proceed to making the HTTP POST request using the endpoint
if st.button("Classify", icon = "🔎"):
# First check if the User has entered values for all the input features
if all(value != None for value in [variance, skewness, curtosis, entropy]):
# Create dictionary payload for the POST request
payload = {
"variance": variance,
"skewness": skewness,
"curtosis": curtosis,
"entropy": entropy,
}
# Send POST request to API endpoint
try:
# HTTP POST request
response = requests.post(f"{BASE_URL}/classify", json=payload)
# If the HTTP request is successful, then extract the value from JSON response
if response.status_code == 200:
classification = response.json()
st.success(f"Classification: {classification}")
# Else return an error; This error is for cases where the network request was sent to the server but returned an error
else:
st.error("Error: Unable to classify banknote")
# This except block handles all other errors where the network request didn't even go through to the server
except requests.exceptions.RequestException as e:
st.error(f"Error Message: {e}")
else:
st.warning("Please enter valid numerical values for all input features")
- The code for your web app’s UI is now complete!
Running and accessing the web app
To run your web app, follow the same instructions as mentioned at the beginning of this blog post. First start the uvicorn web server and FastAPI app, and then start your Streamlit front end. You can find the commands below:
# start the uvicorn server
uvicorn app:app --reload
#start the Streamlit app
streamlit run frontend.py
And that’s a wrap! Hope you enjoyed this post and learned a thing or two about creating a web app.