Fine-Tuning OpenAI LLMs: A Quickstart Guide
What You’ll Build
By the end of this walkthrough, you’ll have:
- A repeatable process to prepare training and validation datasets in JSONL format for OpenAI fine-tuning.
- A fine-tuned OpenAI model you can use in the Playground or via the API for emotion labeling.
- A simple way to compare the base model and the fine-tuned model on the same emotion labeling examples.
- A link to the GitHub repo with everything you need to run this end to end.
What Is LLM Fine-Tuning?
Fine-tuning is the process of taking a pre-trained LLM and adapting it to perform especially well on a narrow problem. With today’s ecosystem of models, from open-source options on Hugging Face to hosted models from OpenAI, Anthropic, and Google, most models are already capable out of the box. Fine-tuning pushes them further by training on examples that closely match the task and responses you care about.
In this post, we fine-tune GPT-3.5 Turbo to improve its performance on labeling text with emotion categories. You will see how a well fine-tuned and relatively inexpensive model can outperform more powerful alternatives when the task is clearly defined.
When Does It Make Sense to Fine-Tune?
TL;DR: Fine-tuning usually has higher upfront cost and setup time than prompt engineering or RAG, but it excels when you want more consistent behavior. This includes tighter control over style, output format, and reliability on a well-defined task.
Even though this post focuses on fine-tuning, in practice you will often get the best results by combining all three techniques:
- Prompt engineering: Iteratively refine the prompt with clear instructions (and a few examples when helpful) to steer the model’s behavior.
- Retrieval-augmented generation (RAG): Pull in the right external or internal context at runtime by retrieving relevant information from your data sources.
- Fine-tuning: Train on task-specific examples to “bake in” the behavior you want, especially for consistent formatting, tone, and accuracy.
If you want a deeper comparison, this IBM article is a good reference: RAG vs. fine-tuning vs. prompt engineering
About the Dataset I Used
This is an open-source dataset released by Google Research. In their own words, it is “a human-annotated dataset of 58k Reddit comments extracted from popular English-language subreddits and labeled with 27 emotion categories.”
Each example in the dataset consists of a Reddit comment paired with one or more labels representing predefined emotions. The figure below shows a few sample annotations, taken directly from the Google Research blog post.
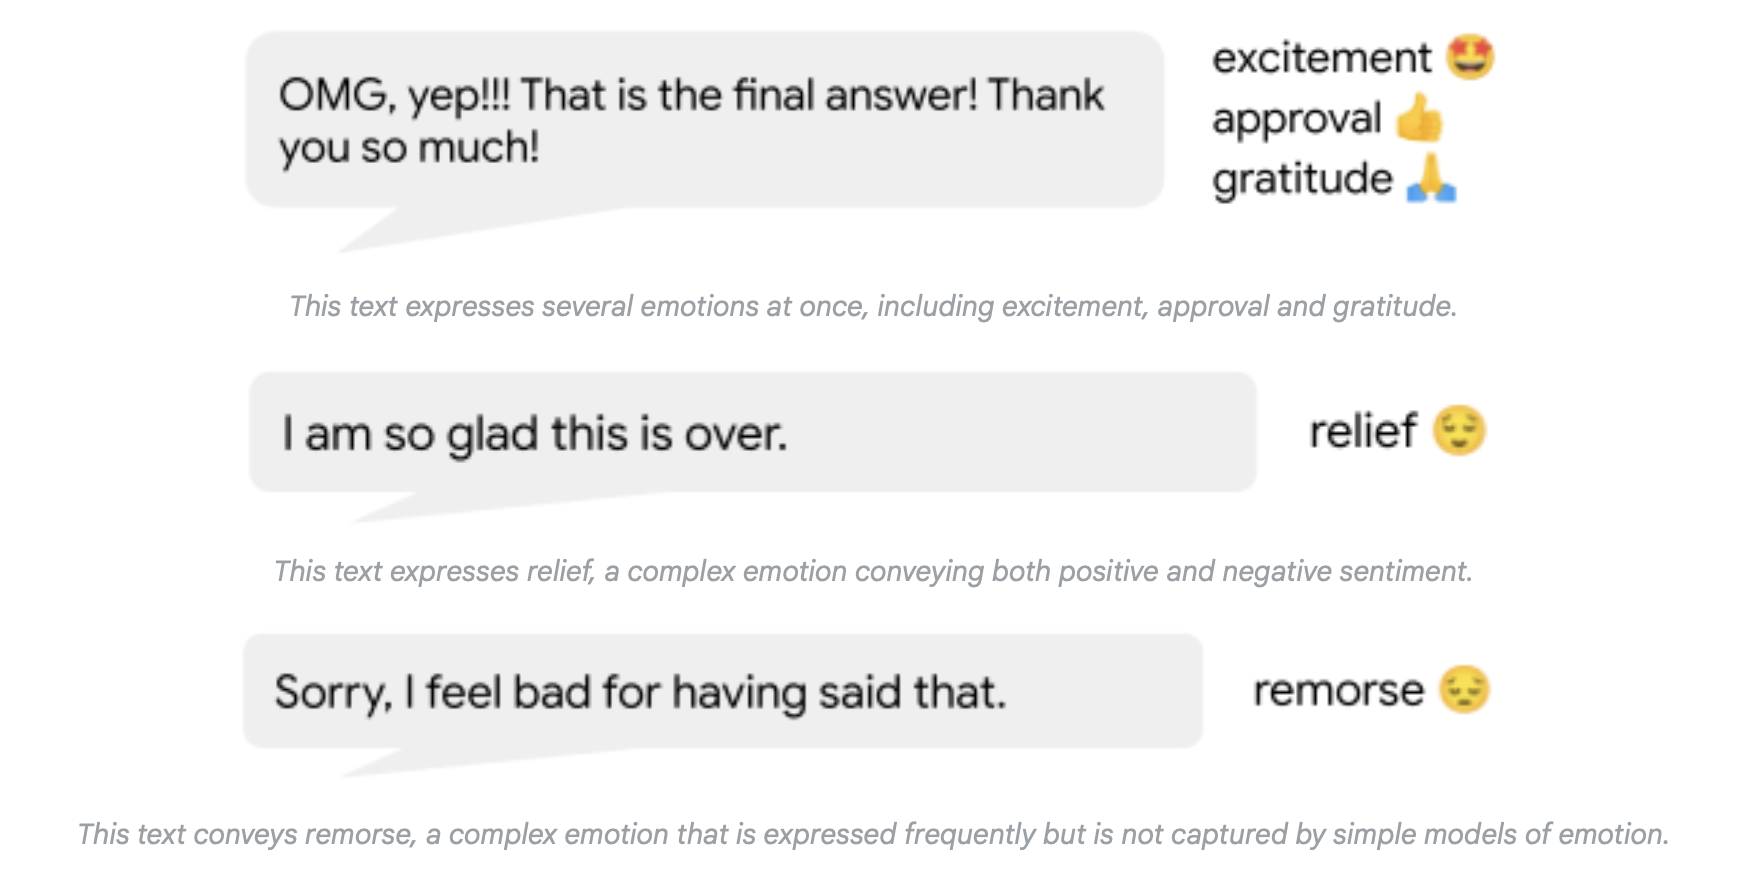
You can read more about the dataset here: GoEmotions: A Dataset for Fine-Grained Emotion Classification
Prerequisites
Before starting this exercise, make sure you have the following in place:
- Create an account on the OpenAI Platform and generate an API key for this project.
- Add some credits to your account to cover inference and fine-tuning costs. At the time of writing, around $5 is sufficient for this exercise, though you can add more if you’d like.
- Clone the project’s GitHub repo:
llm-finetuning-go-emotions - Set up a local Python virtual environment and install the required packages listed in
requirements.txt
Step 1 – Preparing the Training and Validation Data
- Using the HuggingFace
datasetslibrary, load the GoEmotions dataset into the notebook. - Select the first 1,000 rows of the dataset. These will later be split into training and validation sets.
- Manually create a label index and join it with the text comments. After this step, the dataset should look something like the following:

Fig 2. A sampling of text comments and their respective emotion labels. - Validate the dataset to ensure that every emotion label appears at least once (i.e., there are no missing labels).
- Below is the system prompt used in this project. You can modify this and observe how changes affect model performance:
prompt_template = """ You are a highly intelligent emotion classification assistant. You carefully read a comment, and label it with one or more pre-selected emotion labels to it. The emotion labels are listed here: {emotions} Your output should be just the emotion label that you are applying to the comment, and if you think there are multiple labels then output the labels separated by commas. The comment to analyze is here: {comment} """ - Next, create the training and validation datasets in JSONL format. Each line in the JSONL file represents a single example. For training, each example includes the system prompt, the user prompt, and the expected LLM response. The structure looks like this:
training_example = {
        "messages": [
            {
                "role": "system",
                "content": f"You are a highly intelligent emotion classification assistant. You carefully read a comment, and label it with one or more pre-selected emotion labels to it. The emotion labels are listed here: {emotion_labels_str}.Your output should be just the emotion label that you are applying to the comment, and if you think there are multple labels then output the labels separated by commas."
            },
            {
                "role": "user",
                "content": f"Label the emotion of this comment: {row['comment']}"
            },
            {
                "role": "assistant",
                "content": row['emotion labels']
            }
        ]
    }
You can find the full implementation in the Creating training and validation datasets for fine-tuning OpenAI LLMs section of the notebook.
Step 3 – LLM Setup & Performance Comparison
With the training and validation datasets ready, the next step is to set up access to OpenAI LLMs using the API key you created earlier and use GPT-4o mini to generate labels for the first 100 examples. All of the code for this step lives in the # LLM setup for performance comparison section of the notebook. At a high level, this section covers the following:
- Create a
.envfile in the project directory and add your OpenAI API key (make sure this file is not checked into source control). - Load the API key into your environment and import the required OpenAI and LangChain libraries.
- Initialize the GPT-4o mini model and create an inference chain using LangChain, reusing the prompt defined earlier.
- Run inference on the first 100 examples and join the generated labels back to the dataset. You should end up with something similar to the snapshot below—we’ll come back to this later in the project.
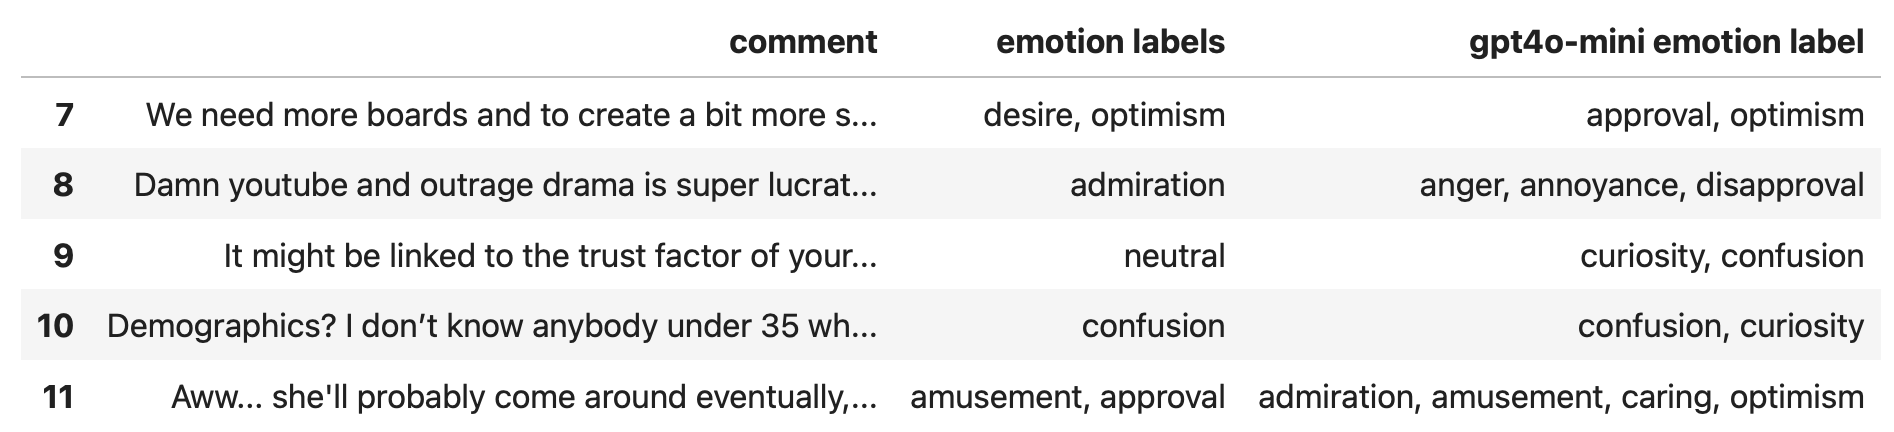
Fig 3. A sample of GPT-4o mini generated emotion labels.
At a glance, you’ll notice that GPT-4o mini tends to produce a richer set of emotion labels compared to the default base-case labels in the dataset.
Step 4 – Validating the Dataset & Estimating Cost
Before kicking off fine-tuning, you should run a quick validation pass to make sure the JSONL dataset is well-formed and doesn’t have any obvious issues, such as missing messages or examples that exceed token limits. This step also helps you estimate training cost by counting tokens and factoring in the number of epochs.
This notebook (finetune_dataset_validation.ipynb) is meant to be a lightweight pre-flight check. Refer to this notebook and the linked OpenAI cookbook if you want to dig into the validation logic or cost calculations in more detail.
Step 3 – Fine-Tuning the Model in the OpenAI UI
This is where we get to the fun part of configuring and kicking off the fine-tuning job.
- Sign into your OpenAI Platform account and then head to the
Fine-tuningsection. - Click on the
+ Createbutton to open up the fine-tuning job configuration form. - Choose any latest available version of GPT-3.5 Turbo to fine-tune.
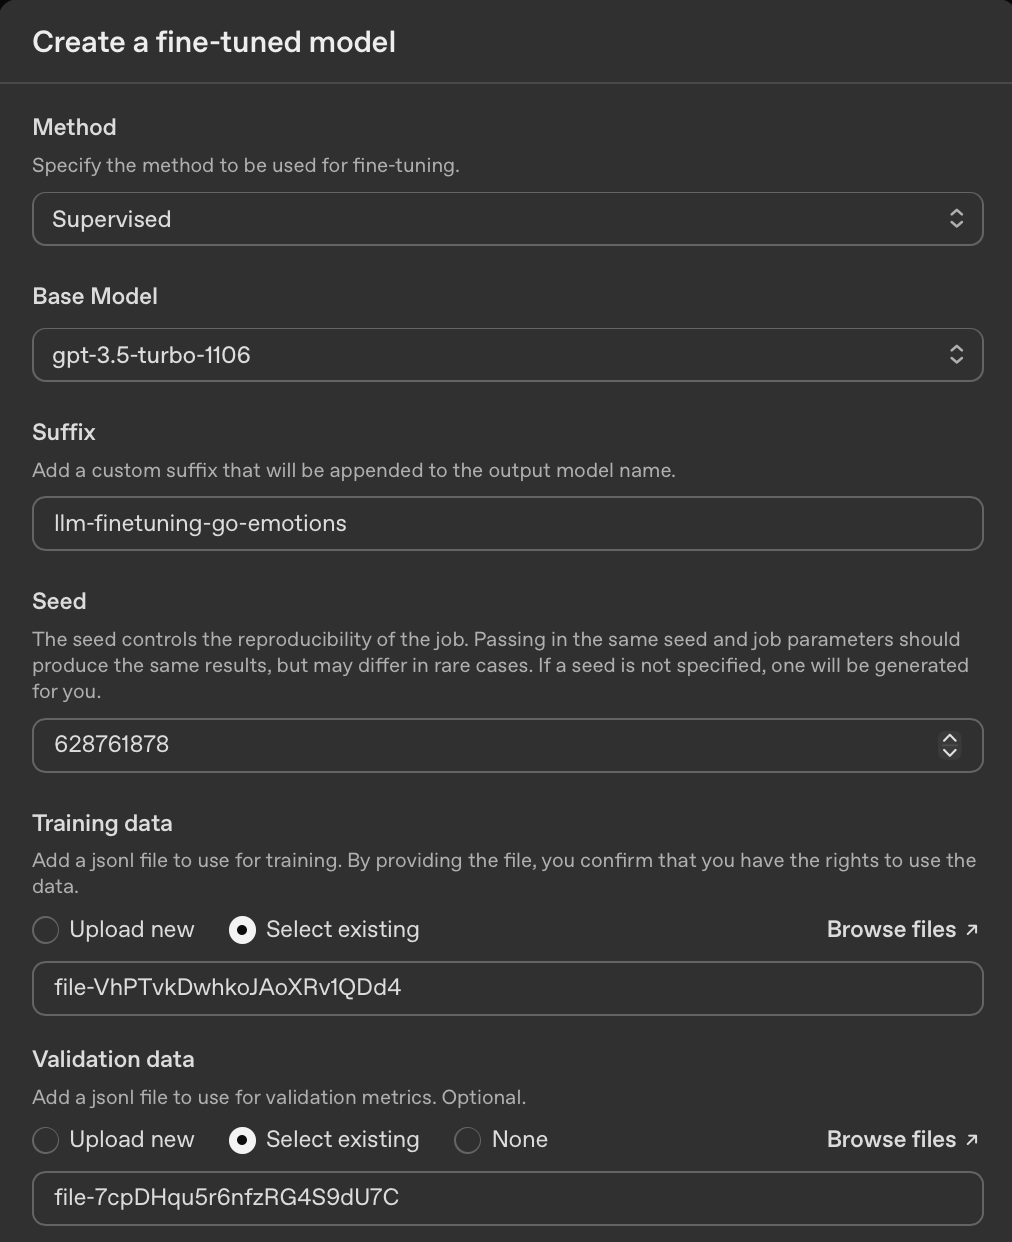
- Enter a value in the
Suffixfield likellm-finetuning-go-emotionsthat will be added into the name of the fine-tuned model to help you identify and differentiate the fine-tuned model. - Upload the training and validation datasets in JSONL format-
training_data.jsonlandvalidation_data.jsonlrespectively. - Let all other fields have the default values and then click
Createto queue and kick-off fine-tuning.
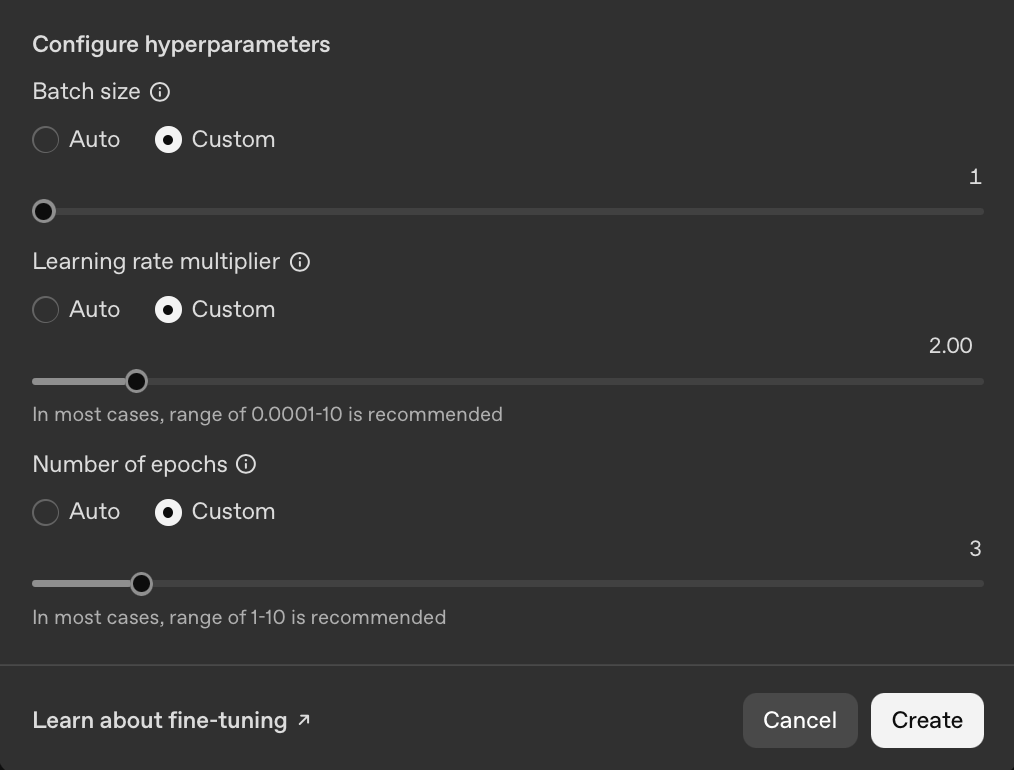
You can find my job configuration below.
The job will go through some checks and validations and can be queued for a few minutes and once it kicks off, you will be able to see the loss and accuracy metrics chart in real-time. After the job is completed, you will see something like the two charts below.

The loss chart is a rough measure of how wrong the model is (lower is better), while the accuracy chart shows how often it matches the expected output (higher is better). In this run, loss trends down and accuracy stays reasonably high, which is a good sign that the model is learning the task. These charts are mainly meant as a quick sanity check, and we won’t dive too deeply into them here.
Step 4 – Testing and Comparing the Fine-Tuned Model
Now that your fine-tuning job is complete, you can now begin using the fine-tuned model for your emotion labeling use-case. You can find the code for this in the Fine-Tuned GPT 3.5 Turbo Comparison section in the dataset_preparation.ipynb notebook. Here is a quick overview:
- Grab the name of the fine-tuned model from the job details - under the
Output modelfield. - Use the same setup like you did previously to create an LLM inference chain - this time for the fine-tuned model.
- Run inference on the first 100 examples from the dataset.
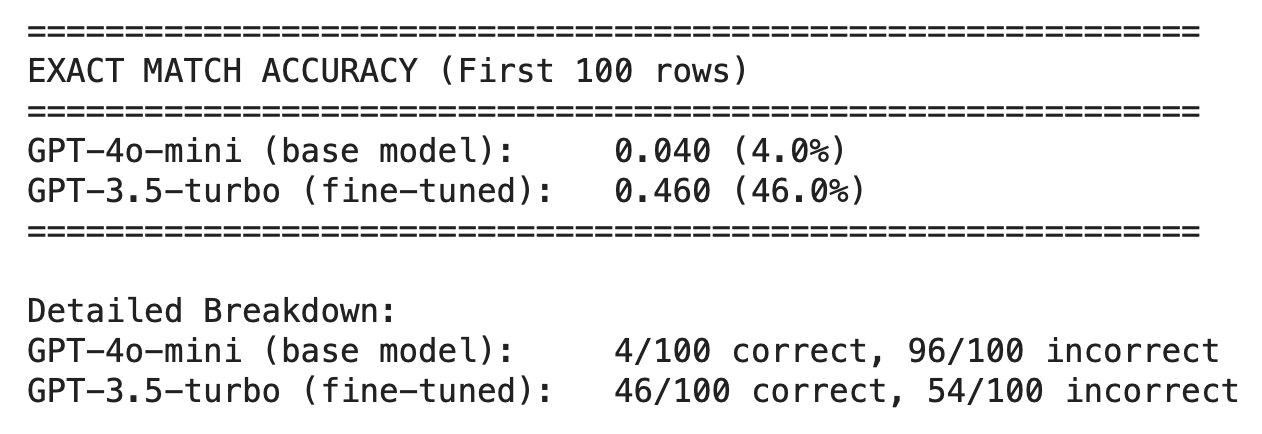
- You can then write a script to calculate the exact match accuracy, i.e., how often the model’s predicted labels exactly match the ground-truth labels, with no partial credit for partial overlap. See the section titled # Classification Accuracy: Fine-Tuned Model Versus Base Model.
- You’ll notice that the fine-tuned model performs markedly better than the base model, achieving 46% exact match accuracy versus 4%!
Lessons Learned from This Experiment
- Data prep dominated the effort: Preparing and validating the dataset took significantly more time than the fine-tuning itself, which suggests there’s value in automating this step when the data format is predictable.
- The UI is good, but the workflow is fragmented: The OpenAI Platform makes it easy to run and monitor fine-tuning jobs, but moving between local data prep, the UI, and post-fine tuning evaluation involved too many manual hops. An API-driven, end-to-end workflow would likely feel much smoother.
- Fine-tuning gives a strong lift, but there’s room to improve: The 42% accuracy gain over the base model is encouraging, but further gains may come from prompt iteration, clearer label definitions, or adding more targeted training examples.
How You Can Try This Yourself
- 🔗 GitHub repo: For a quickstart, you can clone my GitHub repo and use the included training and validation datasets to jump straight into fine-tuning: llm-finetuning-go-emotions
- 🎥 Adam Lucek’s tutorial: I also found this YouTube tutorial helpful while working through this experiment, especially for understanding the fine-tuning workflow end to end:
Fine-tuning tutorial by Adam Lucek